English · Version 1.1.4.0

HyperION DAW User Manual

The complete 29-section HyperION manual for setup, recording, MIDI, VST3, mixing, export and creative tools.

Platform note

HyperION is now available on Windows, macOS and Linux. Windows file paths, ASIO references and Ctrl-key examples describe the Windows context; the core production workflow applies across platforms.

01 · Getting started

Your first project in 10 minutes

Use this path to move from an empty project to a playable, export-ready sketch.

1Create

Choose name, location, BPM, sample rate, and meter.

2Verify audio

Select the device and buffer; test at low level.

3Add content

Drag a sample or create MIDI/pattern material.

4Save and export

Check levels, save, and render WAV/FLAC.

Workflow

  1. Choose File → New Project.
  2. Open Audio I/O; start at 44.1/48 kHz and 256–512 samples.
  3. Drag a WAV/AIFF/FLAC file from Browser into Arrangement.
  4. Add another track or create MIDI in Piano/Pat View.
  5. Press Space; keep the master below 0 dBFS.
  6. Press Ctrl+S. Standard/Ultimate: press Ctrl+R to export.

Checklist

Correct output device

Matching sample rate

No master clipping

Writable project folder

Input gain set before recording

Export range checked

Demo: Project saving, audio/MIDI export, and VST3 hosting are disabled. Activation is required for persistent production.

02 · Installation

System, installation, and first launch

Recommended environment

OSWindows 10/11, 64-bit
CPUModern x64; 4 cores minimum, 8+ recommended
Memory8 GB minimum; 16–32 GB for AI/large projects
StorageSSD; models and projects require additional space
AudioASIO interface recommended
Plug-insVST3 in Standard/Ultimate

Actual requirements depend on track count, plug-ins, sample rate, and AI models.

Install

  1. Download only from the official Gumroad library.
  2. Verify product, version, edition, and source.
  3. Run the installer and choose application/factory-content locations.
  4. Configure audio, buffer, and VST3 folders on first launch.
  5. Enter the license key if you purchased Standard or Ultimate.

Do not use cracks, repackaged installers, or third-party activation tools. They violate the license and can compromise projects, credentials, and device security.

Good starting values

Sample rate

Music: 44.1 kHz. Video: 48 kHz.

Buffer

Record: 64–256. Mix: 256–1024.

Projects

Use an organized, backed-up SSD folder.

Scan

Scan trusted VST3 paths only.

03 · Licensing

Activation and edition comparison

HyperION validates the active edition at runtime. Activation sends the license key, a one-way machine identifier, and device name to the license service. A local activation record is stored in the User’s application-data folder.

CapabilityDemoStandardUltimate
Core interface and workflow evaluation
Project saving
Audio/MIDI export
VST3 hosting
Standard production tools
Advanced AI and generators
HyperTune/HyperPitch and RVC

Activate

  1. Copy the key from the official purchase email.
  2. Open Activation and paste the complete key.
  3. Select Activate while online.
  4. Confirm Standard or Ultimate; restart if requested.

Common errors

Invalid: Verify key and product.

Device limit: Up to three activations may already be in use.

Network: Check VPN, proxy, firewall, and clock.

Back to Demo: Local record may be invalid or tied to another device/user.

04 · Interface

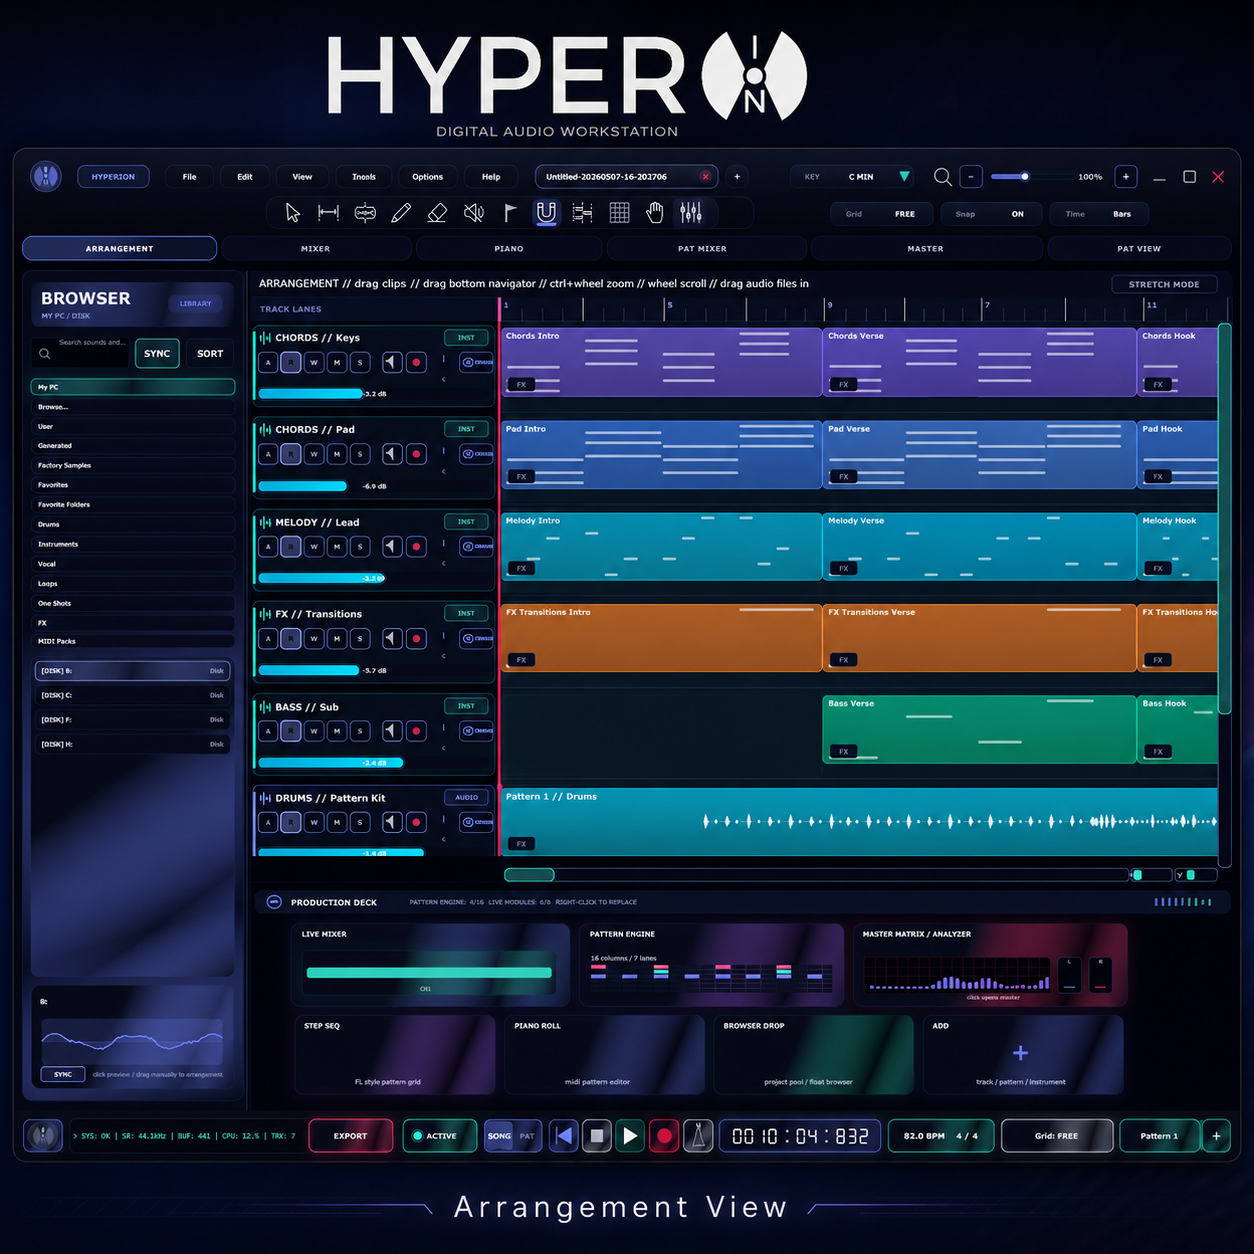
HyperION workspace map

HyperION Arrangement
Arrangement design reference. Labels and placement may vary slightly in the active release build.

1 · Top area

Menus, project tabs, edit tools, snap/grid, and system indicators.

2 · Workspaces

Arrangement, Mixer, Piano, Pat Mixer, Master, and Pat View.

3 · Browser

Disks, favorites, factory content, samples, FX, and MIDI.

4 · Main canvas

Tracks, clips, playhead, grid, and timeline.

5 · Production Deck

Pattern engine, live mixer, stock FX, and quick targets.

6 · Mixer / Control Room

Channels, inserts, sends, faders, and monitoring.

Focus rule: Shortcuts follow the active workspace and selected item. Click the relevant editor before retrying an unexpected shortcut.

05 · Projects

New project, saving, and media integrity

CreateName · location · BPM · meter · rate
Add mediaImport or copy into project
EditTracks · clips · MIDI · routing
SaveProject state + safe file write

Suggested structure

ProjectName/Root folder
Project fileProject state
Media/AudioImported and recorded files
Media/MIDIMIDI assets
ExportsMixes and stems
BackupsVersioned copies

Safe saving

  • Ctrl+S saves the active project.
  • Ctrl+N may open the current build’s Save As flow.
  • Do not move the project while it is playing.
  • Stop and save before disconnecting external storage.

Archive

Collect all project media before delivery. Confirm whether third-party samples and plug-ins permit redistribution. Sending only the project file can leave the recipient with missing media and plug-ins.

3-2-1 backup: Keep three copies on two media types, with one off-site or offline. Sync alone is not a backup.

06 · Audio & MIDI I/O

Devices, latency, and recording path

Audio I/O setup

  1. Open Audio I/O.
  2. Select the ASIO device and input/output channels.
  3. Match project and interface sample rate.
  4. Use a low buffer for recording; raise it for mixing.
  5. Assign track input, enable record arm, and confirm monitoring.

Latency

Approximate one-way buffer latency = buffer / sample rate. 256 samples at 48 kHz ≈ 5.3 ms, plus driver and converter latency.

Buffer guide

TaskStartPriority
Vocal/instrument recording64–128Low latency
MIDI performance128–256Response + stability
Editing256–512Balanced
Heavy mix/master512–1024CPU headroom

MIDI

Select the input device and active instrument track. Enable arm if recording. Computer Keyboard MIDI can also trigger notes when enabled.

Feedback: An open microphone and speakers can create dangerous feedback. Lower monitor level first and use headphones for vocal recording. If the input clips, reduce hardware preamp gain.

Dropout order

Raise buffer → reduce sample rate if appropriate → bypass heavy oversampling/linear-phase processing → check drivers and USB power → close unnecessary background applications.

07 · Browser

Samples, loops, and media import

Browser areas

  • My PC / Browse: File system and chosen folders.
  • Factory Samples: Licensed bundled content.
  • Favorites: Frequently used files and folders.
  • Drums, Instruments, Vocal, Loops, One Shots: Production categories.
  • FX / MIDI Packs: Effects and MIDI material.

Import

  1. Select a folder and filter with Search.
  2. Audition files at low level.
  3. Drag audio to Arrangement, a drum lane, or another compatible target.
  4. For tempo-synced loops, verify BPM and metadata.

Media hygiene

Naming: Use searchable names such as 128bpm_Am_VocalLoop_01.wav.

Format: Prefer WAV/AIFF/FLAC for production sources.

Rights: “Royalty-free” still has license conditions.

Copy: Place critical sources in the project Media folder.

Moved files, changed drive letters, or cloud “online-only” states can create missing media. Test archived projects under a clean user account.

Drag targets

AudioNew/active audio track
One-shotPattern or sampler
MIDIMIDI clip/instrument track
Plug-inInsert/device slot
08 · Arrangement

Track- and clip-based editing

Arrangement is the main workspace for building the song over time. Lanes represent tracks; blocks represent audio, MIDI, or pattern clips.

Core operations

SelectClick a clip or empty space; use Ctrl for contextual multi-selection.
MoveDrag the clip body; Snap aligns it to the grid.
TrimDrag a clip edge to change start or end.
SplitPlace the playhead and press Ctrl+B.
DuplicateCtrl+D duplicates the selected clip or track.
DeleteDelete / Backspace.

Grid and Snap

Grid sets visual timing resolution. Snap defines where edits lock.

  • Drums: 1/16 or 1/32.
  • Melody: 1/8–1/16; triplets when needed.
  • Vocals: fine grid or Snap off.
  • Structure: bars and beats.

Song architecture

IntroIntroduce motif
VerseCreate space
BuildRaise tension
Drop/ChorusMain energy
OutroResolve

Build one strong 8–16 bar section first. Duplicate it into a form, then create contrast with mutes, automation, and variation.

09 · Editing

Tools, selection, and undo

Select E

Select, move, and interact with clips.

Range W

Select a time region for processing/export.

Draw P

Create notes, patterns, or automation.

Erase B

Delete items under the tool cursor.

Split C

Cut a clip; listen for crossfade needs.

Mute M

Silence without deleting.

Undo and versions

Ctrl+Z undoes Arrangement edits; Ctrl+Shift+Z redoes. Piano Roll has contextual undo/redo. Save a version before destructive processing; undo history is not a backup.

Avoid clicks

  • Cut near zero crossings where possible.
  • Use short fades or crossfades.
  • Edit phase-related microphone tracks together.
  • Check transients after time stretching.

Ctrl+D may duplicate a selected track or, when no track is selected, the selected clip. Confirm focus first.

10 · Recording

Clean, reversible audio recording

SourceMic / DI / line
PreampGain + phantom
Track inputChannel + arm
MonitoringDirect/software
RecordTake + file

Before recording

  • Select correct mono/stereo input.
  • Use 48 V only with compatible equipment.
  • At the loudest performance, aim roughly between −18 and −6 dBFS peak.
  • Check arm, monitoring, tempo, metronome, and count-in.
  • Confirm free disk space and write permission.

During recording

* toggles global recording. The transport Record button is also available.

If no meter appears, verify input, arm, and interface channel. Do not change device or sample rate mid-take.

After the take, stop, confirm the file exists, and listen for distortion.

Vocal checklist

Room

Reduce reflections and fan noise.

Microphone

Pop filter, 10–20 cm, stable angle.

Monitor

Closed headphones, safe cue level.

Takes

Full takes plus punch alternatives.

Do not rename or move active recording files in Explorer. Use the project/media workflow to preserve references.

11 · Transport

Tempo, meter, playhead, and sync

Transport

Play/StopSpace
Record*
Return to startShift+B
PositionBars/beats/ticks or time
BPMProject tempo
MeterFor example, 4/4
ModeSong / Pattern

Song and Pattern

Song plays the Arrangement timeline. Pattern loops the active pattern. If the pattern plays but the timeline does not advance, check transport mode.

Tempo changes

MIDI and patterns follow beats. Audio follows warp/time-stretch rules. Back up critical audio and check transients after tempo changes.

Grid · 4/4

GridDivisions per beatTypical use
1/41Kick, chords, structural edits
1/82Hats, melody
1/164Drums, detailed MIDI
1/328Rolls and micro-editing

Recording feel depends on buffer, plug-in latency, and monitoring path. Bypass high-latency plug-ins or use direct monitoring.

12 · MIDI

Piano Roll and note editing

Piano Roll Generator
Controlled MIDI generation by key, scale, rhythm, complexity, and range.

Note operations

  • Draw a note; drag its body to move it and an edge to change duration.
  • Ctrl+A select all; Ctrl+D duplicate; Delete delete.
  • ↑/↓ ±1 semitone; Ctrl+↑/↓ ±1 octave.
  • Ctrl+C/V copy/paste; Ctrl+Z/Y undo/redo.

Expression and groove

Velocity: Dynamics and accents.

Timing: Small controlled offsets can create groove.

Length: Changes staccato/legato feel.

MPE/expression: Per-note control on compatible targets.

Alt+Q Quantize, Alt+R Randomize, Alt+S Strum, Alt+U Chop. Test on a small selection first.

13 · Pattern

Step Sequencer and fast rhythm programming

Step Sequencer
Lane-, step-, and variation-based rhythm programming.

Lane

Kick, snare, hat, 808, clap, or a user sample.

Step

An active cell triggers a note. Sixteen steps commonly represent one 4/4 bar at 1/16.

Pattern

A reusable rhythm variation placed into Song mode.

Four-step method

  1. Build the kick/snare skeleton.
  2. Add a regular hat subdivision.
  3. Use velocity, timing, and humanize.
  4. Create a second pattern for fills.

Controls

+16/−16 changes length. Clear removes content. Import/MIDI manages input/output. Score/Generator opens edition-dependent generation tools.

Duplicate a pattern before Clear/Reset. Check kick/808 phase and headroom in the full mix, not only in solo.

14 · Pattern Mixer

Pattern channels, inserts, and routing

Pattern Mixer balances rhythm lanes as independent channels and routes them through effects, buses, and the master.

Channel strip

  • Pan: Stereo position.
  • Fader: Channel level.
  • Insert: Stock or VST effect.
  • Mute/Solo: Temporary isolation.
  • Route: Master or another valid target.
  • Automation: Slot and mix parameters.

Gain staging

Follow source level → plug-in input/output → fader → bus/master. Lowering the fader does not repair clipping inside an upstream plug-in.

Move or copy FX

Drag behavior may depend on modifiers: normal drag can move a slot; Ctrl may clone it. Confirm the destination and level afterward.

Simple drum-bus path

KickFoundation
Snare/ClapCharacter
Hats/PercMotion
Drum BusGlue/saturation
MasterHeadroom

Parallel paths can create comb filtering when latency or phase differs. Check delay compensation and mono compatibility.

15 · Mixer

Level, pan, inserts, sends, and routing

Signal flow

Source / Clip GainRaw level
Insert ChainEQ, dynamics, creative FX
Pan / FaderStereo position and mix level
Bus / MasterSumming and final output

Practical targets

Headroom: Leaving roughly −6 dBFS peak on the master can be useful while mixing, but it is not a universal rule.

Pan law: Affects center level.

Mute/Solo: Diagnose in solo; decide in context.

Meters: Peak, RMS/LUFS, and true peak describe different behavior.

Insert or send?

ProcessInsertSend/bus
Corrective EQ/gateUsuallyRarely
CompressionChannel controlParallel compression
Reverb/delaySpecial sound designShared space
SaturationChannel colorGroup/parallel color

Build the mix at a modest listening level. Level-match A/B comparisons so “louder” is not mistaken for “better.”

16 · Plug-ins

VST3 scanning, loading, and stability

First scan

  1. Add the VST3 folder in Preferences.
  2. Start Scan/Rescan and let it finish.
  3. Inspect failed items in the scan log/quarantine.
  4. Load a compatible instrument or effect into the correct slot.

VST3 hosting is disabled in Demo and enabled in Standard/Ultimate.

Stability protocol

  • Use current 64-bit plug-ins from trusted vendors.
  • Isolate the newest plug-ins if scanning crashes.
  • Test sound and automation after closing/reopening the UI.
  • Record plug-in versions and presets for delivery.
  • Render critical parts as a recovery path.

Missing plug-in

HyperION should preserve project state where possible, but a missing plug-in cannot produce sound. Install the matching version and rescan; if recovery fails, render stems on the original system.

CPU overload

1

Reduce oversampling/quality.

2

Raise buffer.

3

Freeze/render instruments.

4

Share sends and bypass unused FX.

Third-party plug-ins are supplied by their vendors. Redact keys, user names, and private paths from crash reports.

17 · Stock FX

Built-in effect family

Availability can vary by edition and release build. A compiled or previewed control does not guarantee retail availability.

ToolTypeStarting use
HyperEQEQFiltering, resonance control, tonal shaping, stereo/mid/side bands.
HyperComp / HyperMBDynamicsLevel control, bus glue, multiband balance.
HyperVerb / HyperDelayTime FXShared space and rhythmic repeats.
HyperSat / HyperTapeSaturationHarmonic color with level matching.
HyperDucker / DuckDesignerDuckingSidechain space and envelope design.
GainRiderLevelingLong-term automatic gain control.
HyperGross / HyperTaperCreativeTime/gate/stutter and tape/pitch effects.
HyperAutoTone / VoiceForgeVocalPitch, tone, and vocal workflows.
MixFinalizer / MasterLabMasteringFinal processing with loudness/true-peak checks.

Good practice

Level-match bypass comparisons. A louder output is easily mistaken for a better output.

Example order

Corrective EQ → compression → saturation → creative FX → safety limiter. Adapt to the signal and goal.

18 · Automation

Writing parameter movement safely

Automation records changes to volume, pan, sends, and plug-in parameters over time.

Workflow

  1. Select the track and parameter.
  2. Open its lane and create clear start/end points.
  3. Shape segments and curves.
  4. Loop and listen for jumps or zipper noise.
  5. Recheck mapping after a plug-in update.

Common uses

Volume ride: Keep a vocal or lead present.

Filter sweep: Control build energy.

Send throw: Delay or reverb on selected words/fills.

Pan: Controlled stereo motion.

Mix/bypass: Section-based effect changes.

Safety

RiskAction
Parameter jumps at playback startAdd an explicit point before the section.
Manual fader returnsCheck the active automation mode/lane.
Plug-in update changes mappingArchive preset, version, and critical render.
Too many pointsSimplify points and use musical curves.
19 · Control Room

Monitoring, phones/main, and metering

Purpose

Control listening level without changing the mix bus; separate phones and main outputs; support safe comparison and monitoring.

PhonesHeadphone/cue level
MainMain-monitor level
MeterOutput and clipping
StateSelected monitor/output

Calibration approach

  1. Leave the master at the production reference.
  2. Raise the physical/Control Room level from low.
  3. Compare a known reference at matched loudness.
  4. Check quietly, at a normal level, and only briefly louder.

Take regular breaks. Stop listening if you experience ringing, pain, or temporary threshold shift and seek professional medical advice when appropriate.

Reference sequence

MonitorsBalance/space
HeadphonesDetail/noise
MonoPhase/center
Small speakerMidrange
Low levelPriority
20 · Mastering

Quality control before final delivery

Process

  1. Repair clipping, clicks, DC, and excessive sibilance.
  2. Choose references and delivery target.
  3. Make small tonal/dynamic changes.
  4. Control final level and true peak.
  5. QC on multiple systems and formats.

Measurements

Peak: Sample peak.

True peak: Estimated reconstructed peak.

LUFS: Perceived loudness over time.

Dynamics: Evaluate with genre and intent.

Correlation: Stereo/mono phase relationship.

Delivery checklist

Clean start/end
No clicks/pops
Noise checked

True peak suitable
Mono compatible
Level-matched reference

Correct naming
Correct format
Full-file listen

There is no single correct LUFS value. Consider platform normalization, genre, dynamic intent, and the delivery specification together.

21 · Export

Audio mix, stems, and formats

FormatOptionsUse
WAV16/24/32-float; 44.1–96 kHzMaster, mix, archive, professional delivery
FLACLossless; 16/24-bitSmaller lossless delivery/archive
AIFFPCM; 16/24/32-floatApple/media workflows
MP3320 kbps; 44.1/48 kHzListening copy, not production archive
OGG Vorbis256 kbpsWeb/game and specific platforms

Options

  • Range: Full Song or Time Selection.
  • Stereo Output.
  • Normalize Peak.
  • Include Insert FX.
  • Export All Tracks: stems.

Ctrl+R WAV; Ctrl+Shift+R FLAC.

Safe offline render

Export uses a verified offline process. Cancellation should preserve existing files. After completion, play the entire output in another application.

Some plug-ins behave differently offline; compare against realtime playback when needed.

Audio export is disabled in Demo. Use versioned filenames. Agree with the recipient on how shared send/reverb returns appear in stem delivery.

22 · Files

Application data, logs, and backup

Local data examples

Activation%APPDATA%/HyperION/license.json
Generator settings%APPDATA%/HyperION/DemoSongComposer.json
Logs/crashesApplication-data or build-specific log location
AI models/cacheConfigured model folder
ProjectsUser-selected project location

Back up

  • Project file and complete Media folder.
  • User presets, MIDI, and sample libraries.
  • Custom AI models/manifests where licensing permits.
  • Plug-in list, versions, and critical presets.
  • Final mix, stems, and delivery metadata.

Copying activation data to another computer is not a license transfer; machine validation will fail.

Versioning

Song_v01Idea
v05_arrangedStructure
v12_mixMix
v15_masterFinal
DELIVERYRead-only archive
23 · AI safety

Using AI tools responsibly

HyperION may combine local models and optional API providers. Before a job starts, verify data flow, ownership, cost, retention, and output-use conditions.

Local processing

  • Audio remains on the device.
  • Network may be required only for model download.
  • Compute and storage remain User responsibilities.
  • Model and output licenses still require review.

API provider

  • Prompts, settings, and selected references may be transferred.
  • Fees, quotas, retention, and training rules depend on provider.
  • Credentials must remain protected.
  • Confirm permission/upload controls before sending.

Six questions before sending

1. Do I own the audio or have permission?

2. Does it contain personal, biometric, or confidential data?

3. Which provider and country receive it?

4. What are retention, training, and opt-out rules?

5. Are cost and quota approved?

6. Has output passed human and rights review?

Unauthorized voice imitation, deceptive content, or uploading protected recordings can be unlawful. Access to a feature is not permission to misuse it.

24 · Ultimate AI

Stem Separation & Advanced Refinement

Stem Separation

Workflow

  1. Select audio you may lawfully process.
  2. Choose Vocal/Drums/Bass/Other or another supported target.
  3. Select quality, sub-stem, and refinement options.
  4. Choose new tracks, grouped folder, or WAV delivery.
  5. Check artifacts and phase in solo and full mix.

Better results

Use clean, lossless, unclipped audio. Heavy limiting and reverb make separation harder. Compare a short preview before running the highest quality.

Artifacts: warble, transient loss, vocal bleed, phase issues, and ambience holes. Blending with the original may sound more natural.

25 · Ultimate AI

Track-to-MIDI and HyperTune

Track to MIDI

Track-to-MIDI

Analyze monophonic, melodic, or rhythmic audio and create editable MIDI. Clean the source, choose the correct mode/range, and import into a new MIDI clip or track.

  • Correct false octaves and unintended grace notes.
  • Do not automatically quantize everything to 100%.
  • Verify tempo and clip-start offset.
HyperTune

HyperTune

Analyze pitch blobs and edit note pitch, transitions, and—where supported—formants. Contextual shortcuts include Space for preview, Delete for selected items, and arrows for pitch movement.

  • Verify key and tonal center first.
  • Preserve natural vibrato and transitions.
  • Listen for consonant/formant artifacts before render.

Analysis is an aid, not an absolute musical judgment. Polyphonic and heavily processed sources increase error rates.

26 · Ultimate AI

Prompt Audio Studio · Local + API

Prompt Audio Studio

Idea & Style

Positive/negative prompt, genre, mood, and purpose. Describe musical properties instead of imitating a living artist.

Generation

Mode, BPM, duration, key/scale, variation, seed, provider, and model.

Delivery & Safety

New track, normalization, safety filters, lyric/reference permissions, and local/API state.

Reference-audio safety

Selecting a reference must not automatically upload it. Before Generate, clearly confirm both reference rights and upload/privacy permission. Never send confidential client material without authorization.

27 · Reference

Keyboard shortcuts

Global / Arrangement

SpacePlay / stop
*Toggle recording
Ctrl+SSave
Ctrl+PCommand palette
Ctrl+RWAV export
Ctrl+Shift+RFLAC export
Ctrl+ZUndo
Ctrl+Shift+ZRedo
Ctrl+C/VCopy/paste clip
Ctrl+BSplit at playhead
Ctrl+DDuplicate track/clip
Ctrl+1/2/3Workspace 1/2/3
F8Show/hide Browser
F9Arrangement/Mixer toggle
F11Full screen

Piano Roll / Tools

E/W/P/B/C/MSelect/Range/Draw/Erase/Split/Mute
Ctrl+ASelect all notes
Ctrl+D/C/VDuplicate/copy/paste notes
↑/↓Transpose ±1 semitone
Ctrl+↑/↓Transpose ±1 octave
Alt+Q/R/S/UQuantize/Randomize/Strum/Chop
DeleteDelete selected item
A W S E D F…Computer keyboard MIDI notes
Z/XKeyboard MIDI octave −/+
1…9MIDI velocity

Shortcuts depend on keyboard focus and the active workspace. Physical key positions may differ with the selected keyboard layout.

28 · Troubleshooting

Quick diagnostic matrix

SymptomCheckAction
No soundAudio device, master route, mute/solo, fader, clipSelect the correct output; verify the master route and hardware meter.
Empty recordingInput channel, arm, monitoring, preampMatch the track input; confirm signal on the interface meter.
Crackle/dropoutBuffer, CPU, sample rate, heavy plug-insRaise the buffer; reduce oversampling; freeze or render tracks.
MIDI is silentInstrument, MIDI target, channel, active trackLoad an instrument; select/arm the track; verify the MIDI input.
Plug-in missingVST3 folder, 64-bit build, scan logAdd the folder; rescan; isolate incompatible plug-ins.
Project media missingMoved file, changed drive, online-only fileRelink the media folder or restore it from the project archive.
Export differsOffline behavior, range, inserts, normalizationCompare realtime playback; verify settings and plug-in modes.
AI job failsModel, manifest, disk, provider, quota, credentialRefresh model state; test a short input; inspect the provider log.
Activation failsKey, network, system clock, three-device limitVerify the key and firewall; contact official support privately.

Minimal test project

New project44.1 kHz / 512
One WAVNo plug-ins
PlaybackMaster route
Export24-bit WAV

If the issue disappears in the minimal project, focus on plug-ins, routing, or project data. If it remains, focus on the device, driver, or installation layer. Include exact reproduction steps, edition/version, Windows version, interface, sample rate, buffer, and relevant plug-in version in a support report.

29 · Support

Support, bug reports, and security disclosure

Bug report

  1. Retest with the latest build from the official Download page and in a new project.
  2. Separate expected behavior from observed behavior.
  3. Provide short, numbered reproduction steps.
  4. Include HyperION edition/version, Windows version, audio interface, sample rate, buffer size, and plug-in version.
  5. Attach only redacted logs and screenshots.

GitHub Bug Report Form

Security vulnerability

Do not disclose a suspected vulnerability in a public issue. Privately report the affected edition/version, impact, reproduction steps or minimal proof of concept, and redacted logs through the official Gumroad profile.

Official HyperION Gumroad profile

The publisher aims to acknowledge receipt, assess the issue, and coordinate remediation for reproducible reports within a reasonable period.

Never publish

License keys or purchase receipts

API keys, credentials, or tokens

Unlicensed copyrighted audio/projects

Personal data or private file paths

Use Gumroad privately for purchase, billing, and download-access questions. Use GitHub for reproducible software bugs only.